Thursday, April 26, 2012

Old Barns of Grand Teton National Park

Barn & Bison


On my first visit to Grand Teton National Park, back around 1992 or 1993, my daughters and I were traveling with my Mother and Father in their motorhome.  We had picked up a small pamphlet in Jackson that explained where to find all of the iconic photo locations in the park.  Dad tried so hard to convince me that we should go to the barns on what is called "Mormon Row", but I wasn't interested!  Somehow I had this peculiar notion about what I did and didn't want to photograph in the Tetons, and it probably ran mostly along the lines of Ansel Adams' famous black and white image taken from the Snake River Overlook.  (You can see my previous post of a couple of weeks back for my images taken more recently from that spot.)

Thankfully, I guess that I've become slightly more open minded over the last 20-something years, or at least I've learned to enjoy photographing a few more spots that I stubbornly resisted back then!  Now I always enjoy coming to this spot, even though I've been there many times before.


It is not unusual to find Bison grazing in this area of the park, sometimes in large herds.  On this particular morning, several passed back and forth through my view, but this one fit my composition best.


Sunny Morning- Grand Teton N.P.

Both of the barns above are located within a quarter mile or less from each other.  I've photographed this spot at sunrise before, but I really like it better later in the morning when all of the detail in the barn is well illuminated.  In retrospect, perhaps a few puffy white clouds in the sky might add to the composition, but this just gives me a reason to come back again sometime to this park.


I hope all of my friends will enjoy these images, and that you'll also get a chance to visit this spot.
Bill

Sunday, April 22, 2012

Olympic National Park

- A Diverse Land of Coast and Forest

               Surf and Sea Stacks

   Olympic National Park is located along the Pacific coast of Washington.  I think of it as a very diverse park, with a northern section bearing grand mountain peaks, a coastline with sea stacks and tide pools filed with starfish, and the only rain forest in the U.S.

   The photo above was taken at the end of a fine day in June spent hiking and photographing. The waves were just beginning to pick up a touch of warm light as sunset approached. All of my images of this park were taken back in the days when photographers actually used film, consequently there are some images that I don't yet have digitized, and so will have to be saved for a later post some other day.
Tech info:  Nikon F3, 500mm mirror lens, Fujichrome Velvia, filmscan


                                      Hoh Rain Forest- Trail between fallen logs

  This photo illustrates the size of the trees and logs that one finds in the Hoh Rain Forest.  It's also memorable to my wife and I for the following story.  Before we took this hike in the rain forest, I convinced my wife to come see the starfish in the tidal pools along the coast.  Unfortunately, while crossing a small wash on the way to the tide pools, my wife slipped and fell into the water.  Luckily, she wasn't hurt, but the red jacket that she is wearing in the above photo got soaked, and her pocket filled up with sand and muck. As the day wore on, she began to notice that her jacket was getting an increasingly strong odor of decaying marine life.  Just about this point in the trail, we met another couple hiking up the trail.  As we passed, we heard the woman ask her husband "What on earth is that smell...?"  


                                   House of the Forest Elf?

   My wife was a reading teacher at the time we took this trip.  She used to talk about writing beginning children's reading books, and using my photographs for illustrations.  This stump looked to us like it had a series of steps on the right side, perhaps to where a forest elf enters his house?

                         River and Mist


Tech Info:  Nikon F3, Nikkor 24-55mm, Velvia


                                Tree trunk- Hoh Rain Forest

   (Notes for Camera Buffs)-  This photo was taken with a Sinar monorail 4" x 5" view camera that I acquired just before taking this trip.  Since this camera is designed more for use in a studio than for taking out into the filed, I decided to build a wooden box to fit the camera in, and modified a two-wheeled luggage cart to carry the entire assembly on.  Although one can't particularly tell it from these photos, the trails of the Hoh Rain Forest involve considerable elevation changes.  Which is fine, except the trail has what seems like a million small steps.  So, my hikes through the rain forest that year were marked by a series of "ker-plunk, ker-plunk, ker-plunks"  as I wheeled my view camera up and down those steps.  On getting home, I traded it for a field camera. 


                                    Nurse Log

   When I look at this image, I always see a pair of legs wrapped around each other.  I wonder- is that what I like about it?

Tech info:  Sinar monorail 4" x 5", 90 mm lens, Kodak T-Max 100, film scan  

I hope that my friends who view this post will enjoy these images.  Or maybe better yet, that they will be inspired to go and visit this wonderful treasure of a park for themselves!
Bill

Wednesday, April 18, 2012

Ancient Ruins of the Four Corners Region

      (-and the Perils of Sheet Film)


    House on Fire Ruin
   Although the rock striations in the overhang above House on Fire Ruin resemble tongues of fire even in the shade, the most vivid colors seem to occur later in the morning, when the sunlight reflecting from the rock in front of the ruin helps provide a warm glow.
   I prefer a very wide angle lens at this spot.  My widest angle of view among my equipment is obtained with my 4” x 5” field camera and a vintage (but serviceable) 65mm Schneider Angulon lens.  My images that I took with that combination were lost, however.  Here’s part one of my tale of woe:  During my return trip home to Missouri, I stored my sheet film holders containing the images from this spot in an ice chest cooler, in order to protect the film from excessive heat during lunch stops in the July heat.  A family member also stored an opened carton of milk in that same cooler.  You guessed it- the milk naturally spilled, and ruined all of my exposed film.  Some day, I hope to return to this spot, and next time I’ll be more cautious with my film!
   Tech info:  Nikon F4, 19mm Vivitar lens, Fujichrome Velvia, high res film scan.

    Fallen Roof Ruin
   Although the trail to this spot is marked with rock cairns every now and then, it can still be a bit tricky to follow the first time one hikes there.  Fortunately, on my hike, I was lucky enough to run into a very nice couple who were kind enough to help show me the way.
   In my opinion, the widest angle-of-view lenses provide the best compositions at this spot.  My widest camera and lens combination is my 4x5 and 65mm Angulon.  After capturing multiple images with this combination, and remembering my lesson learned the year before, I resolved to be extra cautious with my exposed sheet film.  I even mailed the exposed film to a reputable E-6 processor en route back home.
   Part two of my tale of woe:  When I received my order back from the film processor, I gleefully opened the box to see my images.  To my horror, the processor had mistakenly failed to develop my film, and mailed it back to me in my original box, un-developed.  Of course, the instant that I opened the box in room light, it was ruined.
   Some day, I hope that I can return with my view camera to both House on Fire and Fallen Roof Ruins, and actually get some images successfully with the view camera!  In the meantime, I guess these will have to do.
   Tech info:  Canon 40D, 12-24 Tokina at 12 mm.

    White House Ruin
   White House Ruin is perched on a high cliff in Canyon de Chelly National Park.  It is easily viewed from the opposite side of the canyon, but at a great distance.  It is much better viewed by hiking down into the canyon, which is an easy hike down, but a bit more strenuous coming back up!  Those familiar with the work of Ansel Adams may remember that he once photographed this ruin.  (His well-known image was shot as a vertical).  His wonderful image  led me to want to come to this spot myself.
   My only visit to White House Ruin was back in the days of shooting film, 1997 B.D. (before digital).  Of my images of this spot, I’ve always tended to prefer the prints that I made direct from medium format black and white film.  Since I lack a digitized film scan of this negative, here is my attempt at a reproduction derived from a flatbed scan of a proof print.
   Tech info:  Mamiya 645, 45 mm lens, T-Max 100 film, flatbed scan of b & w print

                             Interior view- Mesa Verde
   Since the exteriors of the ruins at Mesa Verde have been extensively photographed by others already, I think the image that I will choose to display here should be sort of a change of pace.
   Tech info:  Canon Digital Rebel XT, 18-55 lens at 18mm, time exposure

   There are many more ancient ruins in this region that I haven’t yet had the chance to visit.  I hope that I can continue to photograph more of them in the future.  In the meantime, I hope that you’ve enjoyed this small sampling.

   Bill

Thursday, April 12, 2012

Canyonlands National Park (North Section)

           -An arch even better than Arches for Photography?
Which is to say, does Canyonlands National Park have an arch equal to its nearby neighbor, Arches National Park?  For me, it’s a moot question- they’re both great places to visit and photograph.
       Sunrise- Mesa Arch

   Mesa Arch is located on the edge of a canyon on the east side of the Island in the Sky district of Canyonlands.  At sunrise, on cloudless mornings, the warm sunlight strikes the red rock beneath the arch, reflecting a warm orange glow on the bottom side of the arch.
   Mesa Arch is an extremely popular sunrise destination for photographers, especially at peak months in the fall.  On my last visit there, I decided that I wanted more photos of the left side of the arch, so I got there about 2 hours before sunrise to make sure that I got the spot that I wanted.  I was too late- the left side was already full of photographers, and I had to settle for shooting on the right side of the arch.
Tech info:  Fuji  GSW 690 II, 65mm lens, Velvia. 
    Mesa Arch (left side, after sunrise)
   It’s not always crowded at Mesa Arch, however.  On the trip that I shot the above photo in late June, I was the only person there when I arrived at the arch before sunrise.  As the sky began to lighten just a bit in the east, I began to hear something swooping over my head.  I soon realized that it was a group of bats having a feeding frenzy catching insects.
   I was struck with a note of fear.  Just how far north do (sometimes rabid) vampire bats live?  I hitched up my photo vest to cover the back of my neck, and backed several yards away from my tripod.  After a few minutes of imagining that I was about to be the next meal for a blood-thirsty bat, I heard a sound on the trail.  “flip-flop-flip-flop-flip-flop…”  Two teenage girls in flip-flop sandals, shorts, and sleeveless shirts popped over the rise.  One exclaimed “EEEEEWWWWW-Cool!  Bats!”  So much for the ego of the “macho” landscape photographer!
       False Kiva
   There are other good photo destinations in Canyonlands, too.  False Kiva is on the western side of the island in the sky district.  It’s a moderate hike to reach this site.  On my visit there, the rock cairns that mark the trail were hard for me to spot as I got close to my destination.  I had just given up in defeat without finding the spot, but as I was leaving, I spotted the cairns that I’d overlooked earlier.  Luckily, I was able to find the spot after all.  I'd like to go back again sometime when there are more dramatic clouds in the sky.
Tech info:  Canon 40D, 12-24 Tokina, polarizer.  Multiple exposures combined in Photomatix HDR post-processing to control brightness in the sky and bring out the clouds.
       Ancient Grainery- Aztec Butte

   This photo taken near the top of Aztec Butte is admittedly a work-in-progress, but I included it here because it's perhaps one of the less frequently photographed spots in Canyonlands.  The extreme contrast between the northwest sky and the grainery under the overhang is a challenge for my admittedly modest post-processing skills.  The above image was shot on transparency film, and I’d like to try it again someday using all-digital capture to see if I like the result better.  There may also be better times of the year for this spot, for getting more light back under the overhang.  If at first you don't succeed, try, try again...
Tech info:  Nikon F3, 19mm Vivitar, Velvia.  Bracketed exposures scanned and combined in HDR.
    Dead Horse Point State Park
   Dead Horse Point State Park is technically outside of Canyonlands NP, but since they are virtually next-door neighbors, it always seems a shame to go to Canyonlands without stopping at Dead Horse too.  It overlooks the Colorado River as it meanders between this park and the east edge of Canyonlands.
   Tech info:  Hasselblad 500 C/M, 80mm Zeiss, polarizer, Velvia.


   I hope these photos will help readers appreciate the Island in the Sky District of Canyonlands National Park as much as I always enjoy this park.
Bill

Sunday, April 8, 2012

A View of Arches National Park

    Or, what's all this talk about the light, anyway?


North & South Windows

In all candor, I think I never was as inspired by this view of the North and South Windows (aka the spectacles) as some other views of these arches.  I think the reason may be that I just can't get past the somewhat whimsical notion of just how much this spot resembles a pair of eyes or spectacles.  I want to show it here because one of my favorite cousins is planning a trip to Arches soon.  And, if one is to climb through the arch to the right in this photo and then climb up on a particularly large boulder that is located mid-way up on the other side of the small tower to the far right, then you can get the view of Turret Arch shown in the next photo below. 


Turret Arch through North Window (Frame # 2)

This is a spot that I've visited many times on various trips to Arches, and I'm not sure that any two of my photos taken on different days are quite the same.  A long time ago, I read someone say that when one is photographing landscapes, what you are REALLY shooting is the weather, and the scenery just happens to be there.  I'm not sure that I totally understood that statement at the time, but I've come to appreciate the truth behind it more and more since then.  

The morning that this shot was taken, the light was very diffuse due to some light clouds in the east as the sun rose over the horizon.  It gives the landscape a fairly soft look, with only light shadows.  Now we'll compare the look with the next frame, taken at the same spot, different day.

Tech info:  Mamiya RB67, 50mm, Fujichrome Velvia, exposure not recorded.  Scan of 6x7 cm film strip.


Turret Arch through North Window (Frame #3)

On the morning that I took the image above, the sky was cloudless and the light was very specular (because of the lack of clouds to diffuse it) and also very warm in color temperature.  Notice how the shadows are harsh.  Both frames #2 and #3 above were scans of Velvia transparencies, with no post-processing adjustments.  (In fact, neither image has even had the edges of the transparencies fully cropped.)

Tech info:  4x5 field camera, Schneider 65mm Angulon, Velvia.  (This is a very old vintage lens, and does not have an abundance of coverage, as evidenced by the noticeable vignetting of the edges.  The vignetting would have been improved by a more judicious choice of aperture.  That just gives me another reason to keep coming back to this spot.)


Delicate Arch (Frame #4)

Here is another example of strong, warm light, this time at sunset.  The hike to Delicate Arch involves a mild bit of exertion for someone not accustomed to the elevation, especially if it is hot in the afternoon sun.  But, worth the hike, in my opinion.  I hope I get a chance to do it many more times in the future!

Tech info:  Hasselblad 500 C/M, 80mm, polarizer, Velvia, scanned transparency.


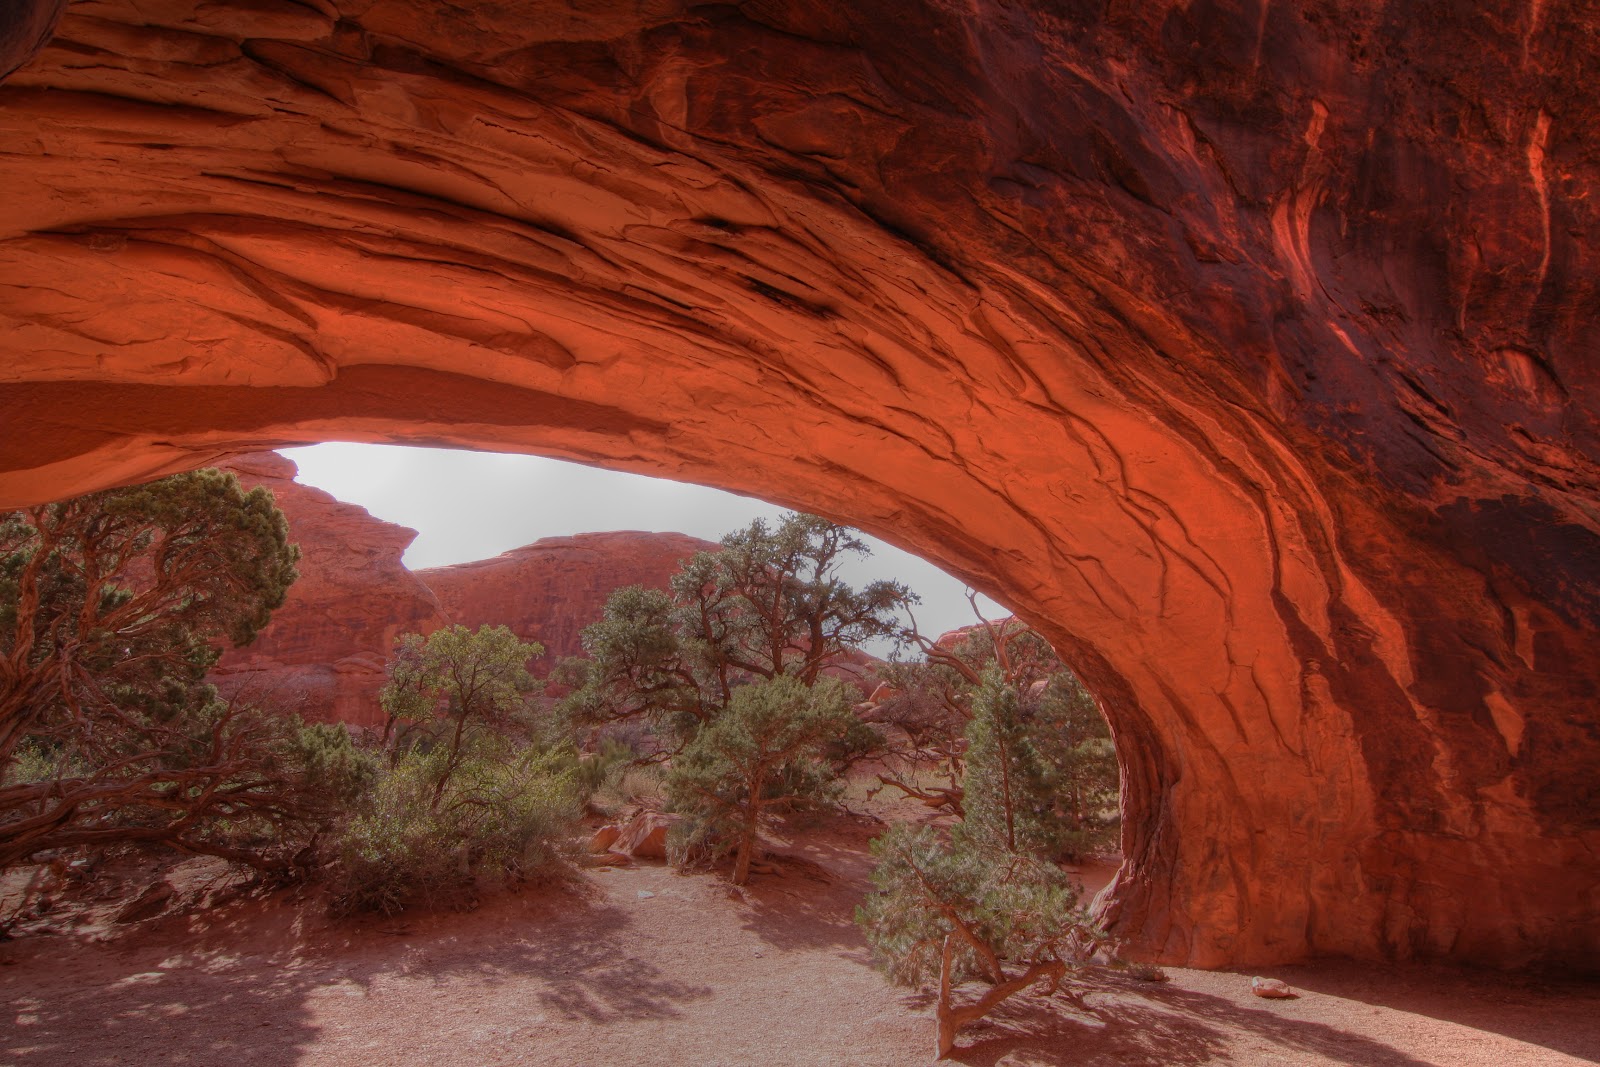
Navajo Arch

Navajo Arch is one of the smaller and less popular in the park, but one of my favorites anyway.  It is reached by a moderate trail starting in the Devils Garden section.  The photo above was taken in afternoon light.  The side of the arch pictured above is illuminated by reflected light, which is what gives it the warm glow.

Tech info:  Canon 40D, 12-24 Tokina at 12mm.  Image processed in Photomatix HDR to reduce contrast between foreground and trees in background.


Balanced Rock before Sunrise (Frame #5)

This image was one of my first experiments with photographing the night sky with digital equipment.  There must have been just a hint of morning sun coming from the eastern sky to provide a bit of illumination on the rocks.

I hope everyone viewing this post has enjoyed this brief tour of Arches, and that all of you get a chance to experience this park someday in person!